Introduction: This tutorial will gradually introduce how to use RAK Wireless's WisCAM camera development board. The development board is based on Linux system and can be easily input into RTSP stream. We will also discuss Linux-related content, serial port debugging, and wireless connectivity. Finally, we will see how to use the built-in ser2net function to send HTTP requests to modify the module settings.
Wiscam Taobao purchase link: https://item.taobao.com/item.htm?spm=a1z10.5-c.w4002-14938546650.18.638a2e6T0NUOm&id=543901093786
Development board
WisCAM is a powerful, embedded Linux-based IP camera that easily captures video streams via the rtsp protocol. The module core hardware is based on the ARM926EJ-32-bit RISC CPU core Nuvoton N32905R3DN processor with a frequency of up to 200MHz @ 1.8V. It's incredible to be able to run powerful Linux on such resource-constrained hardware!
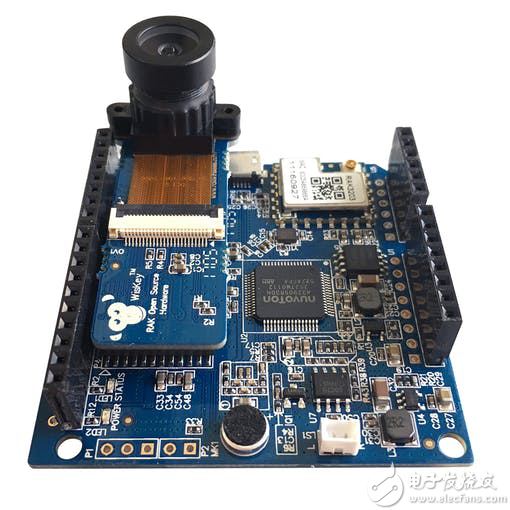
Rakwireless WisCAM Module
Other features of the development board:
Wi-Fi: The network function on the hardware is provided by the onboard RTL8189FTV Wi-Fi chip, which supports IEEE802.11 b/g/n protocol, external antenna and SDIO interface.
· SD card and expansion board: The development board has an expansion board with USB HOST and SD card interface
· Camera: contains a good performance camera module, you can do more functions by collecting images
· Supports Nabto's peer-to-peer communication. Nabto peer-to-peer communication has been integrated, next time we will demonstrate how to get video remotely
The development board has reserved a lot of very useful functions for us, with a large number of GPIO, peripheral interfaces and video functions, which is very suitable for DIY!
The block diagram below shows how the development board can transmit video streams.
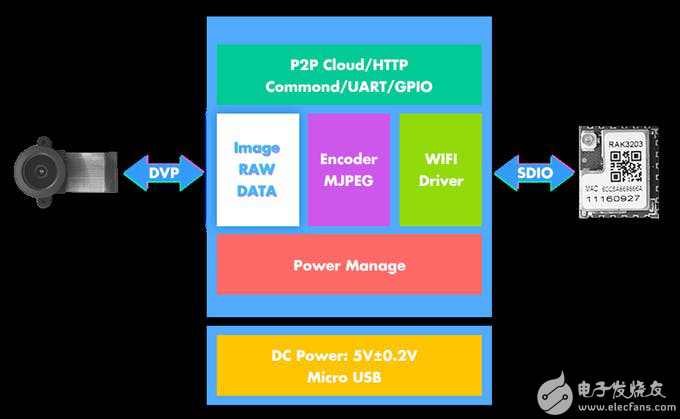
WisCAM software block diagram
GPIO:
The development board reserves a lot of GPIO and is compatible with Arduino. Below is the pin map of WisCAM, including a 10-bit ADC, a microphone, a UART, a speaker and twelve GPIOs (connecting different expansion boards, GPIO The serial number will also change)
Some important pin mappings are as follows:
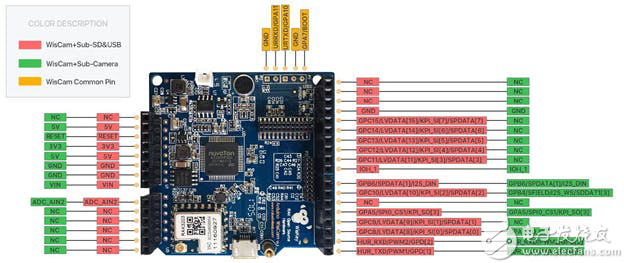
WisCAM PinOUT
Pin default configuration
· HUR_TXD/PWM1/GPD[1] UART transparent transmission output pin, 3.3V
· HUR_TXD/PWM1/GPD[1] UART transparent transmission receive pin, 3.3V
· IOH1 high level enable speaker: off by default
· BOOT/GPA7 recovery mode / normal working mode:
Power-on detection if it is high to enter recovery mode, if it is low, enter programming mode
· URTXD / GPA10 system debug output pin, 3.3V
· URTXD/ GPA10 system debug receive pin, 3.3V.
· DC 5V input, can also be powered by micro-USB
Let the board run!
Before that, make sure you have installed the RAKVideo app in iOS or android. If you want to watch the video on your computer, you must make sure you have VLC installed on Windows or Linux.
· iOS: https://itunes.apple.com/us/app/rakvideo/id1107121689?mt=8
· Android: https://
USB mode: power interface and UVC mode
The development board's Micro-USB interface is connected to the power supply and the computer has different functions.
UVC mode:
UVC mode is like a USB camera, you can watch videos with AMCap or Nuwicam UVC tools.
· AMCap: https://amcap.en.softonic.com/
· GTK+ UVC Viewer: http://guvcview.sourceforge.net/
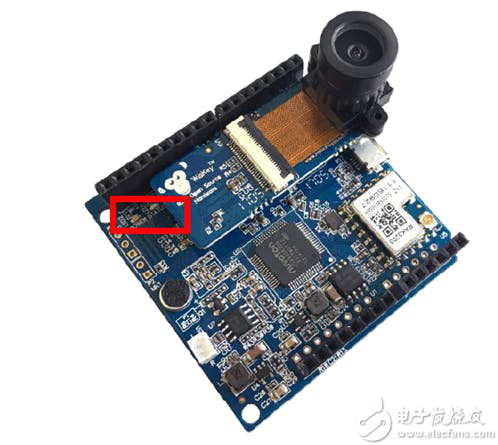
Picture showing the placement of status LED on WisCAM
Picture status LED
UVC mode :
UVC is a common standard in IP cameras and has a suitable library to handle UVC standards. LibUVC can be found at https://github.com/ktossell/libuvc, and documentation on how to use the library is available at https://int80k.com/libuvc/doc/
Power mode :
When the board is connected to the power supply via micro USB, the board will enter power mode. WLAN0 and WLAN1 will be activated, WLAN1 will work in SOFT-AP mode, and SSID will be WisEye-xx-xx-x-xx-x. The default encryption method is WPA2PSK and the password is 12345678.
Establish local stream service
The development board can locally acquire video and broadcast video streams to connected devices. WLAN1 accepts requests from STA devices, allowing connections to Wiseye APs. Once connected, the development board's IP is fixed at 192.168.100.1, and all devices connected to the development board can capture the video stream.
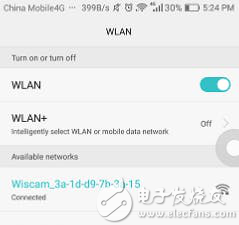
You can also install the Wiscam APP on Android (or iOS). After opening the app, click the pencil icon in the upper right corner on the launch page, a pop-up window will appear, fill in the RTSP URL address mentioned above, and then click OK. If the board is connected to a power source and the phone is connected to a Soft AP, then the board is up and ready to transfer the video to the Android/iOS device.

Android app screenshot

Connecting development board app screenshot
Used on Windows:
If your computer is connected to the wisap SSID, you can install VLC to get the video stream.
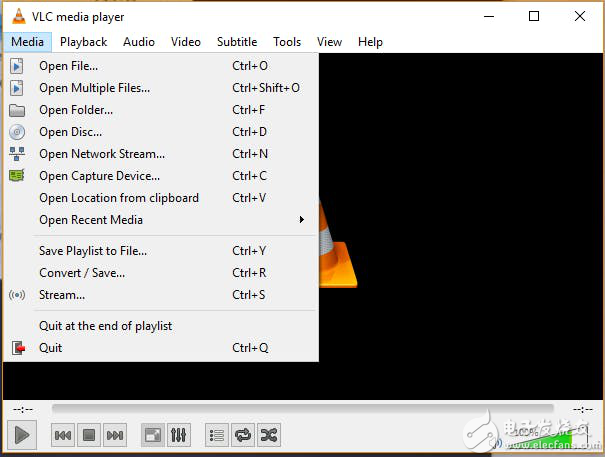
Select Media - Open Network Streaming: The following dialog will pop up
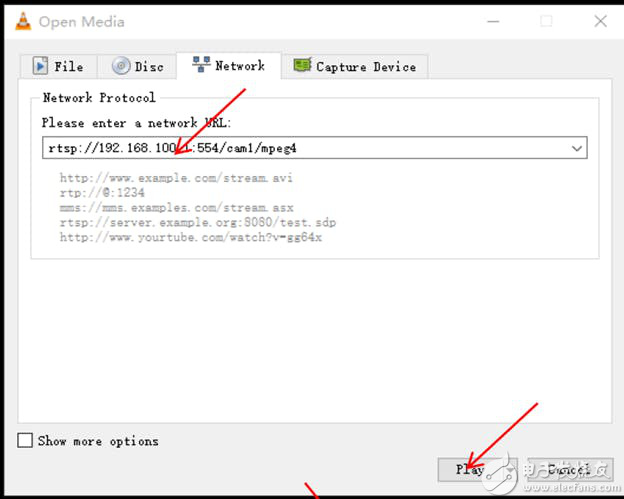
Enter the RTSP URL provided above in the dialog and click on Play, you will receive a video stream from Wiscam
Tip: If playback fails
· Verify that the board is powered and the blue light is blinking. Indicates that the video is being transmitted and that the power supply is 5V 2A
· Confirm that your device is connected to the SOFTAP of the development board
Connect the development board via STA mode:
Since this is a linux development board with wireless capabilities, end users can connect the development board to another AP instead of acting as an AP.
HTTP mode:
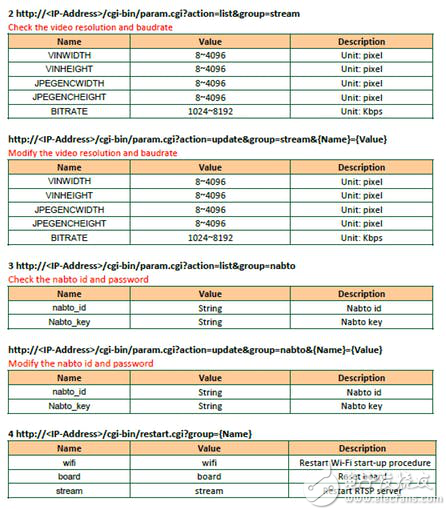
The development board provides an HTTP interface based on the ser2net program, and the browser can use the network function to complete the setup. Both AP and Station modes can be used.
The interfaces that pass the HTTP GET command are listed below:
(http://192.168.100.1/cgi-bin/param.cgi?action=list&group=xxxx
The xxxx options here are: wifi/stream/nabto
The Wi-Fi connection parameters are as follows:
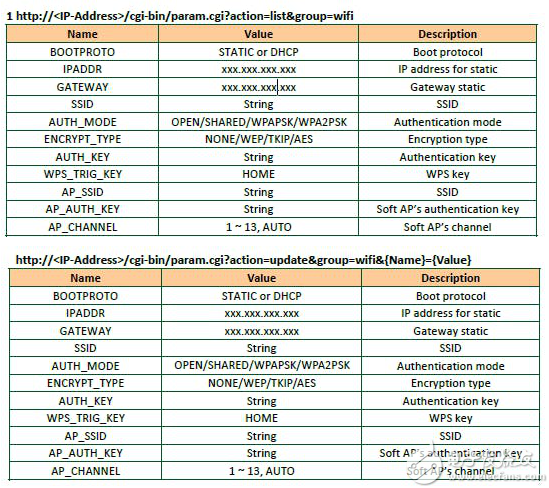
You can set the SSID and password in STA mode through the following two url commands. The {} is the one you need to modify.
Http://{IP-Address of camera}/cgi-bin/param.cgi?action=update&group=wifi&SSID={wifi name}
Http://{IP-Address of camera}/cgi-bin/param.cgi?action=update&group=wifi&AUTH_KEY={wifi
Password}
Other important settings:
As mentioned in the previous section, the development board provides two streams of video streaming, nabto and restart.cgi, which set the camera parameters and the built-in Nabto configuration. We will connect to the development board via Nabto P2P in another tutorial.
Linux related instructions for the development board
Interestingly, the motherboard is running the Linux 2.6 kernel version. This is a streamlined version of Linux that runs very few services and applications. So don't expect applications like the package manager, GUI, etc.
However, this adds a lot of camera-related configuration and processing power to a simple development board. Similar to other embedded Linux, many important services and programs are installed.
· busybox.1.15.2 Linux tool http://
· dnsmasq-2.60 DHCP server http://
· Hostapd Wi-Fi hotspot and authentication server http://hostap.epitest.fi/wpa_supplicant/
· spook-20050207 RTSP server http://
· wireless-tool.29 network configuration utilities http://Jean_Tourrilhes/Linux/Tools.html
· wpa_supplicant IEEE 802.11i supplicant http://hostap.epitest.fi/wpa_supplicant/
· ser2net-2.10.0 serial to network
· http://ser2net.sourceforge.net/
· boa-0.94.13 lightweight web server http://
STA recovery mode! ! ! ! :
It may happen that we send an HTTP command through the ser2net device, causing the STA configuration to fail, so we need to restore to the factory AP mode.
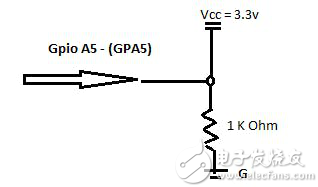
Pull down GPA5
Keep GPA5 pulled down for 5 seconds, the development board will be restored and restarted!
USB serial port connection:
In order to facilitate debugging, you need to connect the development board serial port to Windows or Linux PC to view system information. We can use the FTDI serial cable, the wiring is as follows:
· Serial cable GND connection development board GND
· Serial cable RX connection development board TXD
· Serial cable TX connection development board RXD
After the connection is complete, open the serial port tool, such as putty, set the parameter baud rate 115200-8-N-1
So you can access the linux terminal, enter some common commands to try it!
Other interesting ways to play:
The development board can be applied to image recognition, visual programming, and the like. The following is an introduction:
Processing: Processing is a Java-based creative programming language that helps programmers draw canvases with creative coding. The platform is very stable and is now very mature for video applications:
Resources:
Https://processing.org/
Procesing + OpenCV library: https://github.com/atduskgreg/opencv-processing
Processing + gstreamer implementation for video processing: https://github.com/processing/processing-video/wiki
OpenFrameworks: openFrameworks is an open source C++ toolkit that assists in authoring by providing a simple experimental framework.
Openframeworks and Gstreamer: https://github.com/arturoc/ofxGStreamer
Openframworks rtsp stream handling (MacOS example): http://blog.geoffdonaldson.com/2013/02/14/using-the-gstreamer-sdk-in-openframeworks-under-osx-10-8-mountain-lion/
hardware
PCB and schematic
https://github.com/RAKWireless/WisCam/blob/master/Files/WisCam_1V2_SCH%26PCB_2017.07.06.zip
Source code
WisCam git
Development board Linux firmware and other programs
https://github.com/RAKWireless/WisCam
Nuwicam
Nuwicam routines can run on WisCam
https://github.com/OpenNuvoton/NuMaker_NuWicam_Samples
Soft TPU Hard PCÂ Phone Case,Flip Cover Leather Case,Genuine Leather Case,Best Premium Pu Leather Case
Guangzhou Jiaqi International Trade Co., Ltd , https://www.make-case.com